How to make full use of Sentinare
User Manual, Use Cases, Quickstart Guide, and Demos
The following are the User Manuals of the Sentinare sensor for senior care and patient monitoring in different languages. Please go over the manual to understand the details of the many features and settings of the Sentinare sensor and the app. The following sections of the manual are especially useful:
- 1.8.2 Tips on Fall Detection and Backup
- 1.8.3 Tips on Reducing Number of Alerts
- 1.9 Troubleshooting (in particular, 1.9.3 General Error Recovery Procedure)
The following document provide further details and examples on how to set up Sentinare in different scenarios, such as detecting falls in stairs, leaving bed, going to bed, avoiding sitting too long, and sharing with secondary users.
The following is a quickstart guide of the Sentinare sensor and the App, including some video demos. More videos are available at our YouTube channel.
1: Download the Sentinare App
To use the Sentinare sensor, you need to install the free Sentinare Activity Sensor (formely known as the Cypress visual sensor) App on your mobile device. The sensor also needs to connect to the Internet via a WiFi network with WPA2-PSK (aka WPS2-Personal) security protocol. Sentinare 2 supports both 2.4GHz and 5GHz WiFi, whereas Sentinare 3 only supports 2.4GHz WiFi. However, it can still work with 5GHz-only WiFi with the help of a dual-band WiFi extender. Refer to Sec. 4.1.2 Set Up WiFi of the User Manual or Sec. 3 below for details.
Please choose the following download method depending on your mobile device’s platform:
2: Create a Sentinare Account
- Open the Sentinare App on your mobile device, tap the “Create an Account” on the front page.
- Note: The Sentinare App account is different from your Shopping account at the AltumView website!
- In the “Sign Up” page, fill in your name, email, and password. The email and password are used for login. Please follow the displayed requirements for password format.
- Choose your Server: Tap the pencil icon to choose a server location.
- Currently, there are three servers in United States, Canada, and China.
- When a sensor is sold, its serial number is added to the white list of only one server, based on the country where the device is sold. If you are not in these three countries, please choose the US server.
- Read and accept the Terms of Services, then select “I agree to Terms of Service”.
- Tap the “Sign Up” button. After that, you will receive a verification code in your email account. If you could not get it after a few minutes, please make sure your email address is spelled correctly, and check your junk mail folder.
- Enter the verification code to the next “Confirm Email” page, then tap “Continue” to enter your account.
App Permissions: When you first use the Sentinare app, it will ask for your permissions to use certain features, such as push notification, Bluetooth, and location. Note that you may need to disable some power/battery saving settings of your phone in order to receive alert notifications when the Sentinare app is running in the background. See Sec. 1.4.1 of the User Manual for details.
The following is a video demo of creating a Sentinare account.
3: Add the Sensor to Your Account and Setup WiFi
Since you may need to try several installation positions before finding the best spot, it is recommended to add the sensor to your account and set up WiFi first, before installing the sensor.
- Connect the power and wait until the LED of the sensor flashes white for about 20 seconds. The button on the top is for factory reset, and is NOT needed to turn on the sensor.
- Open the Sentinare App. Tap the Rooms icon in the menu bar at the bottom of the screen. When a new account is created, a default room “1st Floor- Room 1” is created (you can rename it). To add your new sensor, click on the room name “1st Floor- Room 1” to expand it.
- In the next room page, click the “+Add Device” command. The App will search and list all nearby sensors.
- Note: A sensor can only be added to one account at any time. Each room can have up to 10 sensors. If a sensor has been added into another account, its status will be displayed as “Added”, and it cannot be added to a new account unless it is removed from the original account. See the User Manual for details.
- Select the sensor to be added according to its serial number. The LED of the selected sensor will flash green for 20 seconds. In the next page, create a name for the sensor.
- Setting up WiFi: Next the App will set up the WiFi for the sensor. The App will first scan available WIFI networks with WPA2-PSK (aka WPS2-Personal) security protocol. Selecting your WiFi network and entering its password, the LED on the sensor will first turn to red, then yellow and blue, and eventually become steady green. After that, this sensor will connect to WiFi and the server, and appear in the list of sensors in the room.
- Firmware Upgrade: After adding a sensor to the account, if its firmware is not the latest, please upgrade the sensor’s firmware. Please always use the latest firmware as we are constantly improving the firmware. The upgrade might take a few minutes, and the sensor might reboot multiple times. After the upgrade is finished, the sensor will show a steady green light. Please refer to the Upgrade Firmware section in the User Manual for details.
WiFi Extender for Weak WiFi and 5GHz-only WiFi
If the WiFi signal at the Sentinare sensor’s location is too weak, or if you have a 5GHz-only WiFi (Sentinare 3 only supports 2.4GHz WiFi), you can purchase a dual-band WiFi extender, such as the following:
https://www.amazon.com/dp/B07N1WW638
https://www.amazon.ca/dp/B07N1WW638
https://www.amazon.ca/dp/B0D41G5N95
During the setup of the WiFi extender, ensure to activate the 2.4 GHz or dual-band WiFi option to enable the extender to transmit the 2.4 GHz WiFi signal required by Sentinare 3.
After setting up WiFi, the App will ask you to do calibration, which is required for fall detection. Since the sensor has not been installed properly yet, you can select Later in the “Calibration Required” page, and do the calibration after the installation of the sensor in the next step.
The following is a video demo of adding a sensor to an account, setting up WiFi, and performing floor calibration.
4: Install the Sensor
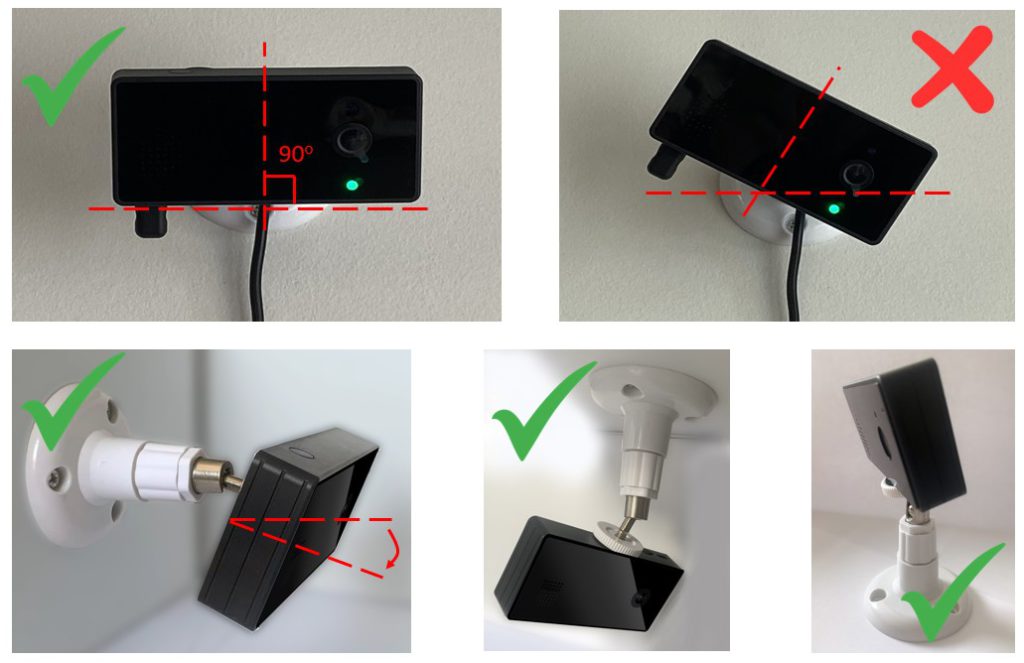
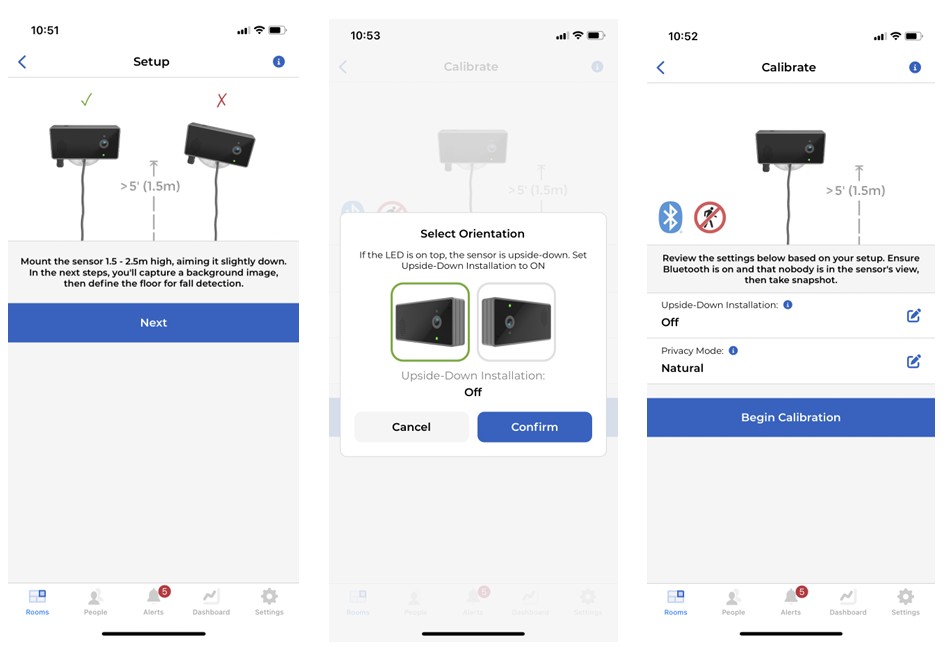
Unplug the power of the sensor. Find an installation position that is about 1.5-2.5m (5-8 ft) above the floor. Install the sensor temporarily such as using packing tape, as you may need to adjust it during the subsequent calibration step.
Tilt it down slightly so that it can monitor most of the room and the floor for fall detection without occlusion. The sensor should not rotate to the left or right, i.e., the line between the lens and the LED light should be vertical. Otherwise, the fall detection algorithm could be confused and generate false alarms.
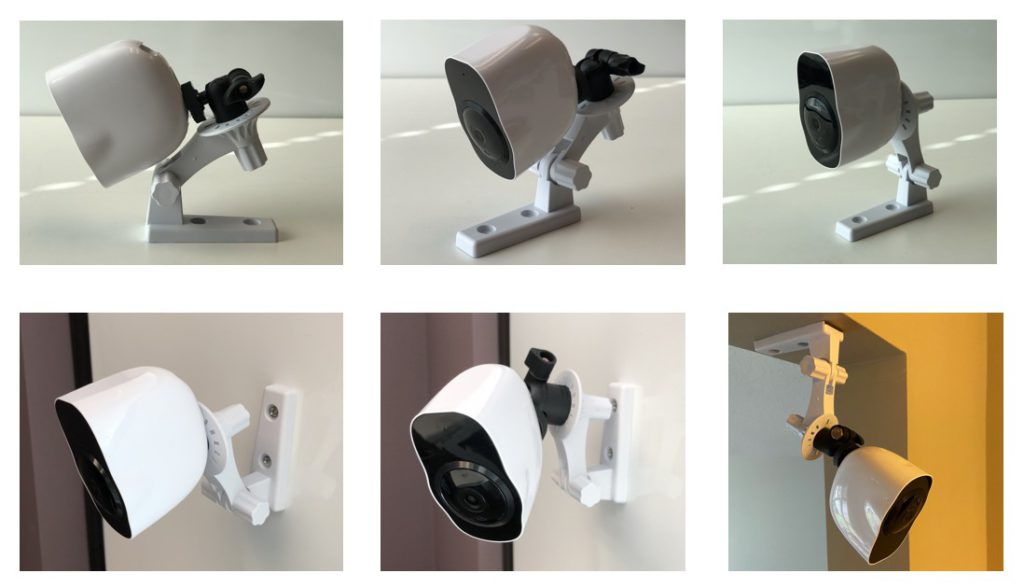
- The stand/bracket can be mounted on a horizontal surface, on the wall, or on the ceiling.
- The sensor can be installed Upside-Down. In this case, you need to turn on the Upside-Down Installation flag in the app.
- If you want to use face recognition (optional), including the Region of Interest feature, the ideal installation height is no more than 2m, so that it can capture and recognize people’s front faces.
The following are different ways to install the Sentinare 3 sensor. Sentinare 3 comes with an 8ft Type C USB cable. You can use other Type C USB cables if you need, as all Type C USB cables can carry at least 3A current, and Sentinare 3 only needs 2A at the most.

The following are different ways to install the Sentinare 2 sensor, with the optional ball head. Sentinare 2 comes with a USB power adapter with 1.5-meter 20 AWG micro USB cable. Please do NOT use other adapter or USB cable, as they may not be able to power the sensor properly. Regular AC power extension cord is recommended to connect the USB power adapter to AC power outlet.


Other Mounting Options
The Sentinare sensor has standard mounting hole with 1/4″-20 tripod screw thread. Therefore it can be used with many other mounting stands. The following are some adhesive mounting stands with 360-degree ball head that can be used with our sensor. Hook & loop tapes such as Velcro can also be used instead of the double-sided adhesive tapes.
https://www.amazon.com/dp/B00BPRLNQ2
https://www.amazon.com/dp/B08MDZQ2XY
https://www.amazon.com/dp/B08NCC2RKG

In addition, you can also use the following removable 3M Command hanging strips, which can be removed without leaving any mark on the surface. We recommend the large size (3.65″ x 0.73″, hold up to 5 lbs) or medium size (2.75″ x 0.73″, hold up to 3 lbs) to ensure hold.
https://www.amazon.com/dp/B0751VFF2P

5: Calibrate the Sensor
- The sensor must be calibrated to detect the floor before it can detect falls correctly. You need to redo the calibration if the angle or position of the sensor is changed. The sensor only sends alert when a person falls to the calibrated floor area. Falling on sofa, couch or bed will not trigger alert.
- To protect people’s privacy, make sure that nobody is in the view of the sensor during the calibration.
- Users must be within Bluetooth range of the sensor (~5m) in order to do the auto-calibration. Manual calibration can be done remotely.
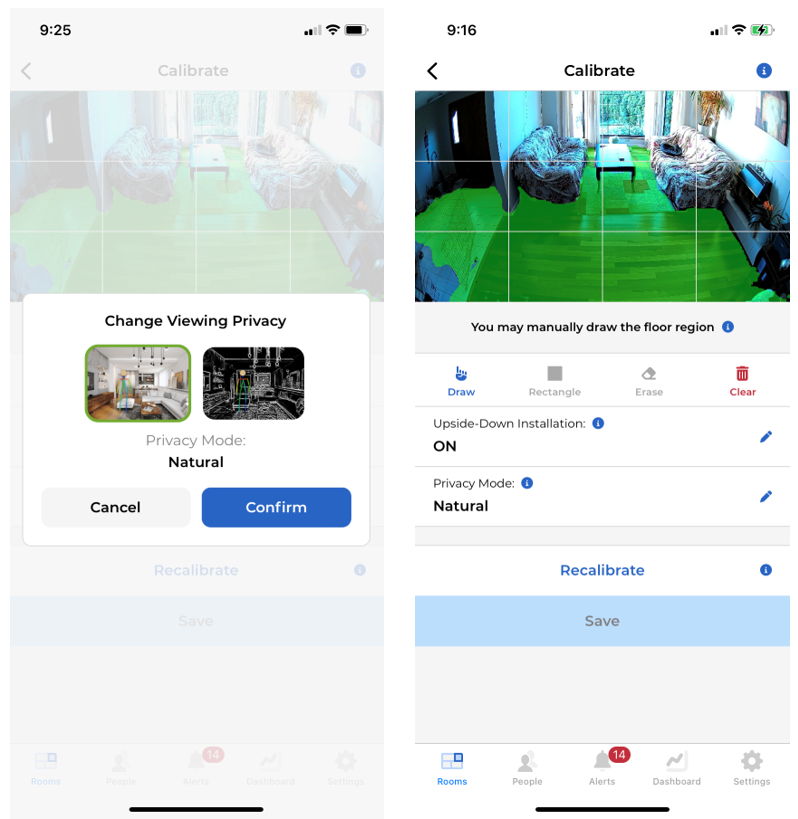
- Power up the sensor. Go to the sensor page in the App, click Calibrate. If the sensor has not been calibrated before, the App will first show some instructions about the installation height and angle, and will ask users to select if the sensor is installed upside-down or not, and if the background image should be natural mode or privacy mode. After making these choices, press the “Begin Calibration” command will start the calibration.
- For the Cypress sensor, the calibration takes about 15 seconds. For the Sentinare 2 sensor, the calibration takes about 30 seconds.
- To ensure good fall detection performance, please ensure the sensor’s height and angle can capture a large area of floor. If the floor area is too small, a warning message will be displayed when you save the result to remind you to adjust the installation height and angle of the sensor.
- You may need to adjust the sensor position and angle in order to get good calibration result, before finalizing the installation. To update the calibration, tap the “Recalibrate” command, the sensor will take a new background image and detect the floor in it. After you can satisfied with the calibration result, tap the “Save” button to save the result and exit the page.
- Manual Calibration: Sometimes the auto-calibration algorithm may mis-calibrate some non-floor areas as floor, or miss some floor areas, which could cause wrong fall detection results. In this case, users can manually modify the calibration result using the editing tools in the Calibration page.


The following is a video demo of calibration using the private mode.
6: Add People (Optional)
- Some features of the Sentinare sensor rely on face recognition, such as collecting individual statistics of each person’s daily activities and face-recognition-based Region of Interest (unless the Detect Anyone option is selected). To enable these features, users need to add the head photos of people that need to be monitored by the sensor.
- Note: Fall detection does NOT require face recognition.
- To add a person, tap on “+ Add Person” at the top of the “People” page. The App first needs to get a head image of the person from the mobile device’s camera or from the image library, as shown below.
- After getting a head image, the “Add Person” page will appear, where the user can input the name of the person and assign this person to a Person Group, such as Seniors or Staff.
- In the next page, users can add or delete photos for the person. In this page, users can change Person Group, and input the person’s detailed information.
For best performance, take the following photos of the head:
- Front view
- 45o left and right views (with both eyes visible)
- 15o top view
The entire head should be in the circle with both eyes visible. The photos should be clear, well-lit, without shadows or other people.
The following is a video demo of adding person to an account.
That’s it!
The sensor is now ready to look after your loved ones! It will monitor their activities, collect statistics, and send alerts when emergencies such as falls are detected. You can check their real-time activities, or review their activity history.
The following are some demos of other powerful features of the Sentinare sensor. Please refer to the User Manual for details.
7. Video Demos of Key Features for Senior Care and Patient Monitoring
1) Fall Detection
When the Sentinare sensor detects a fall, it will send an alert to the Sentinare app. The alert will include a short clip of stick figure animation to show how the person falls, and can help to identify if it is a real fall or a false alarm. If the name of the person is recognized (via face recognition), the name is also included in the alert and the stick figure clip.
Advanced Fall Detection: From firmware version 2.0.555 released in May 2025, the paid subscription plans will include an Advanced Fall Detection feature powered by the latest large Vision-Language AI Model (VLM), which can eliminate almost all false alarms, and capture almost all falls, including difficult falls such as vertical falls, falls partly blocked by furniture, and sitting on the floor after the falls (with a delay of 45s or more for difficult falls). After subscription, this feature can be enabled for each sensor from the Set Fall Detection command of the sensor page.
2) Waving Hand Detection
If a loved one needs help from the caregiver, he/she can wave to the Sentinare sensor to trigger the waving hand detection alerts. The sensor’s LED will flash red for a few seconds, and then turn to purple and send the alert to the App. The alert sensitivity can be adjusted from the App (See the User Manul for details). The video below shows the results with low, medium, and high sensitivities respectively.
3) Region of Interest
Users can define various Regions of Interest, such that restricted region, overstay, and absence. This can be used to detect wandering of people with dementia, or bed exit/leaving of people with high risk of falling. Face recognition is required, unless “Detect Anyone” is selected.
4) Stick Figure Recording
The Sentinare sensor can record and play back all human activities in terms of stick figure animations, which provide valuable visual information while protecting the privacy of the person.
5) Personal Activity Statistics
When the face photos of a person are added to the Sentinare account, the Sentinare sensor can recognize different persons, and collect their individual activity statistics for playback and analysis.
6) API for Third-Party Integration
Using the API provided by AltumView (see Chapter 11 of our User Manual for details), other partners can get the real-time and historical data from the Sentinare sensor and develop their own algorithms and applications.
The following is a video to show how Dr. Bruce Wallace‘s group at SAM3 AGE-WELL National Innovation Hub use AltumView’s sensor and API to study gait analysis of seniors.
For more video demos, please visit our YouTube Channel.
8. Disclaimers
Please note that similar to any other Artificial Intelligence products, the algorithms of the Sentinare sensor are not perfect, although we are working hard to improve them constantly.
By purchasing our products and using our services, you agree to our terms and conditions as stated in our website and in the App, including the disclaimers, limitations of our products and services, and limitation of liability.
In particular, you agree that the device is not guaranteed to detect all possible abnormal events that it is designed for, and is not guaranteed to collect all information without any error. We cannot guarantee in any way that the device will prevent accidents, death or personal injury to you or others, or prevent property damage, illegal entry, or undue delay in any emergency service response, and we are not liable in any manner for any injury, loss or damage resulting therefrom. If you do not agree with these clauses, you should not use our products.